How to set up your account from scratch
🚨 Prerequisites
Make sure you have created your WhatsApp Account first. Check out the Guide on how you can create your WhatsApp Account here.
How to set up your Chatarmin account - a step-by-step guide
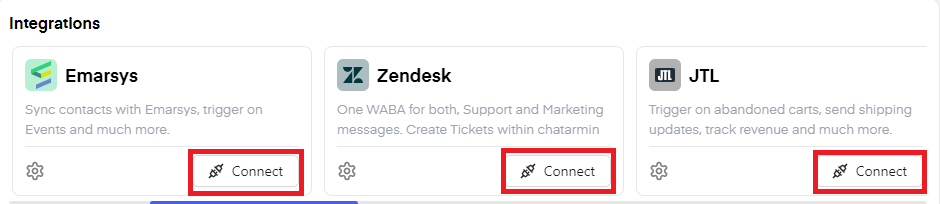
1. Connect your integrations (Smarter Clients)
Once you have successfully completed the technical onboarding and have access to your account you should first connect your integrations to Chatarmin.
To do so you have to log in to your Chatarmin Account. Under "Dashboard" you will see the feature "Integrations"
Simply click on connect and you will be provided with a tutorial on how to connect your integrations.
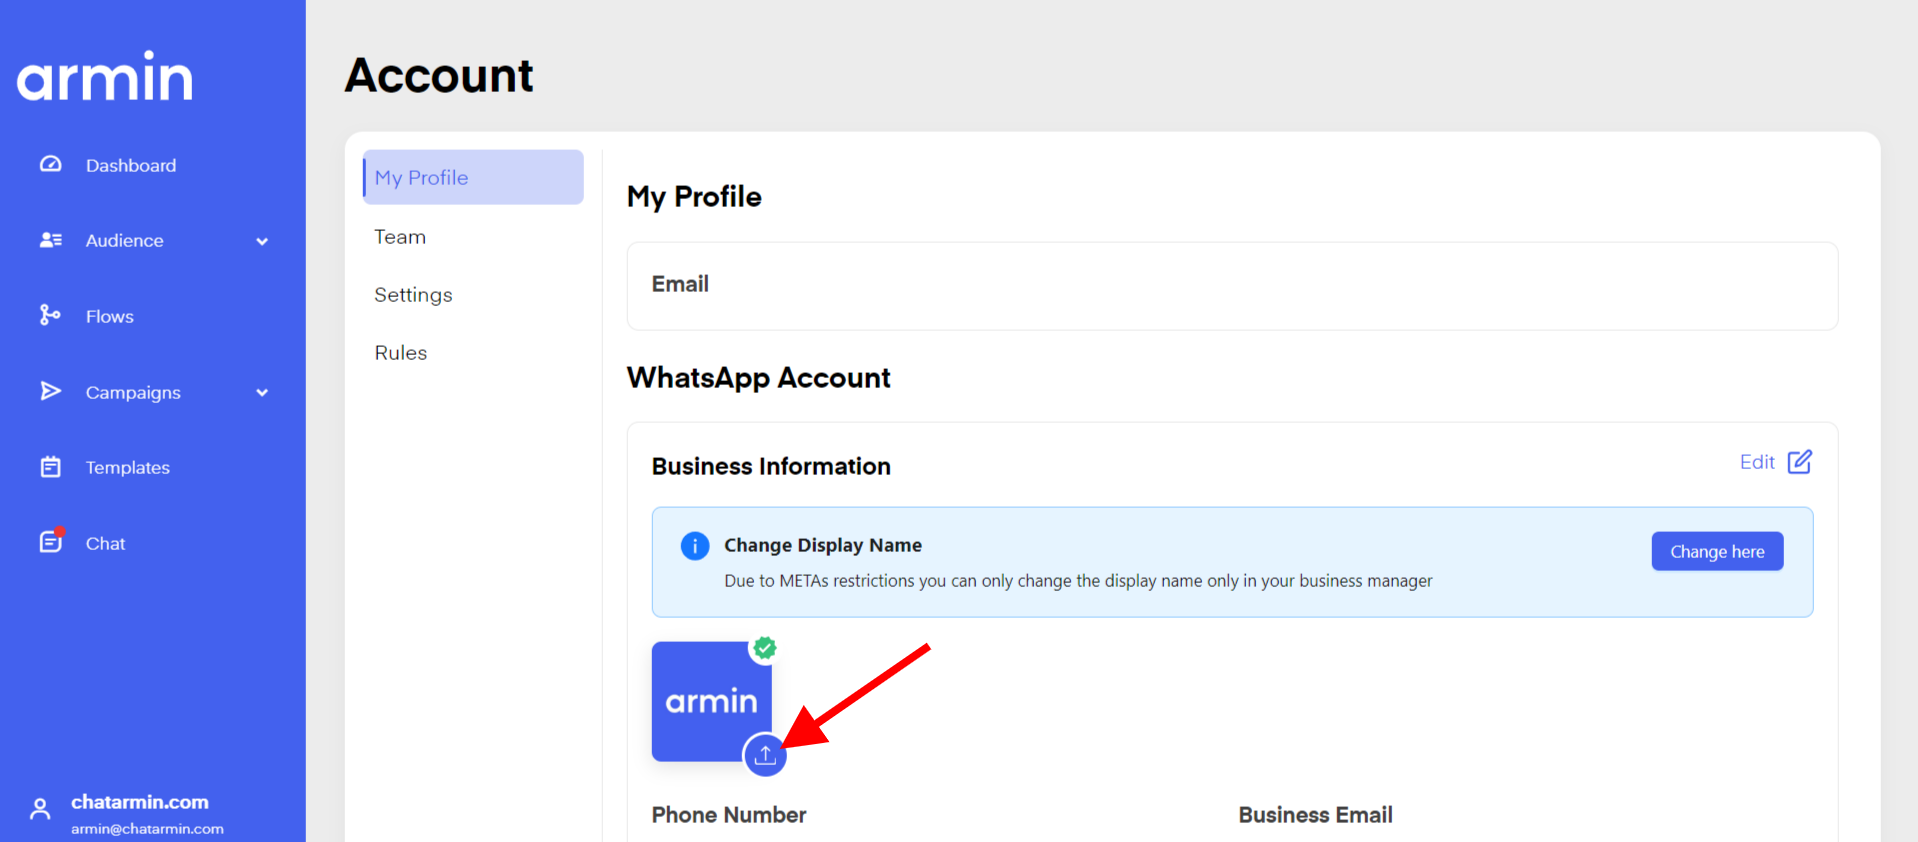
2. Set your Profile Picture
1. Go to https://chatarmin.com/dashboard/profile?page=account
2. Click on the upload icon on the bottom right of the avatar
3. Upload your profile picture. META recommends 1:1 format and 500px:500px
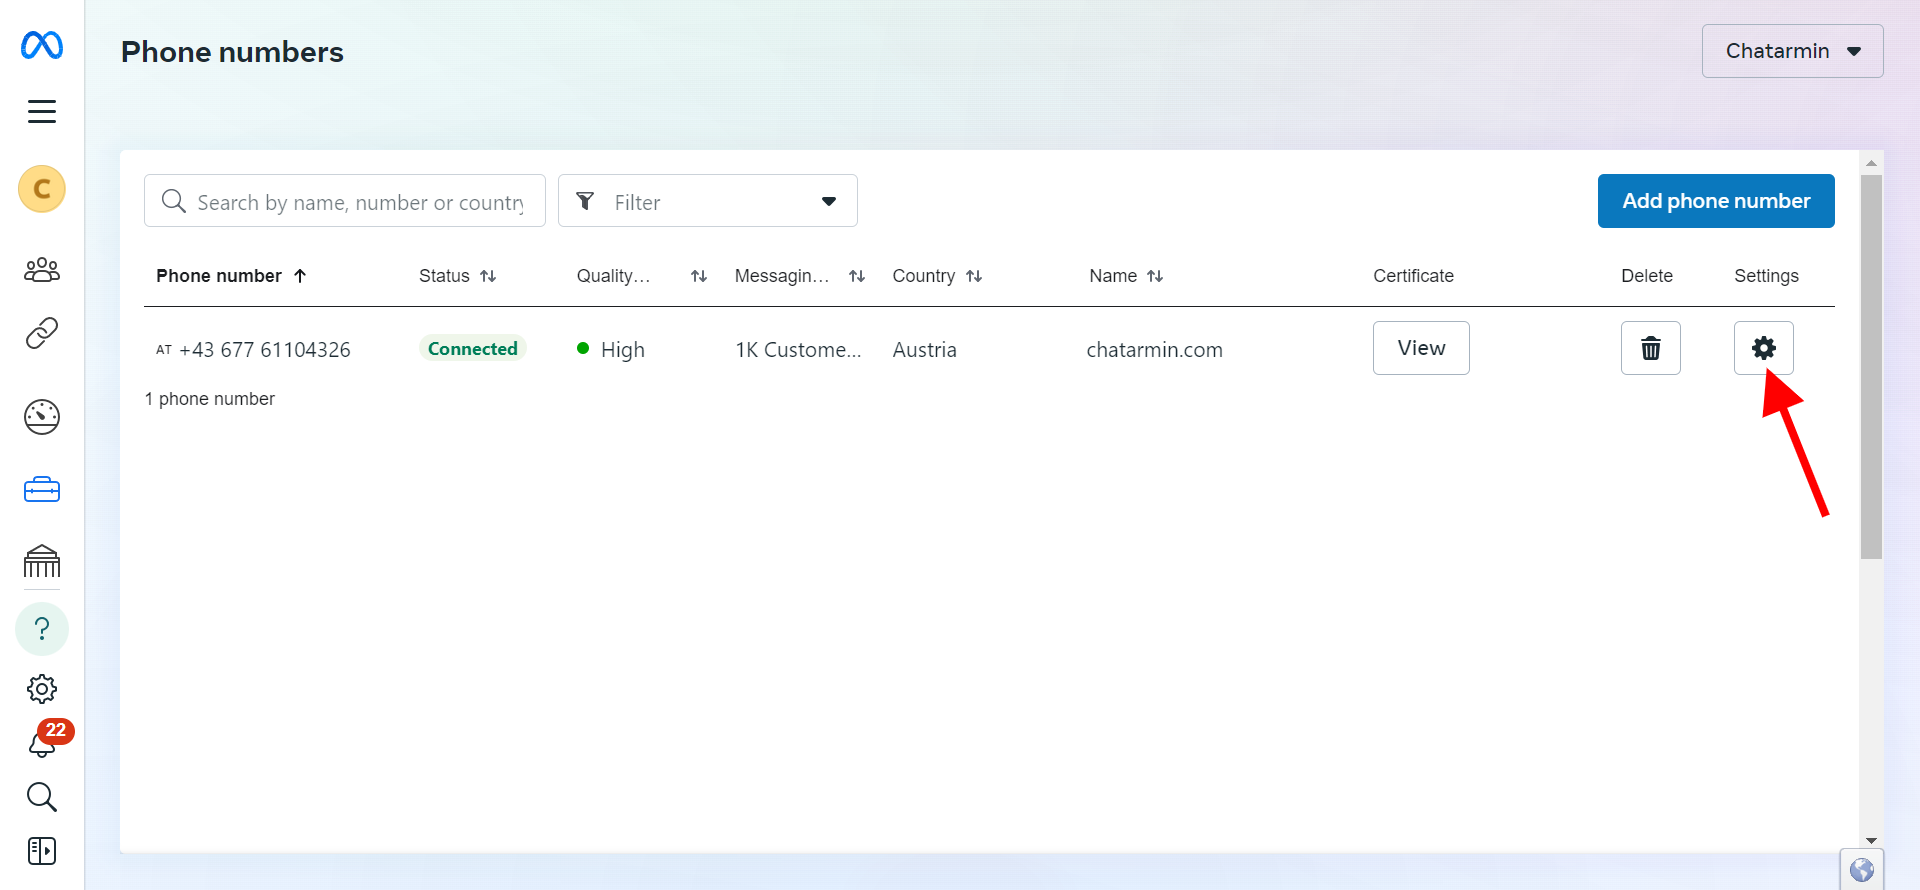
3. Apply for Green Tick
1. Go to https://business.facebook.com/wa/manage/phone-numbers
2. Click "Settings"
3. Click "Profile"

4. Scroll down to "Official business account" and click "Submit request"
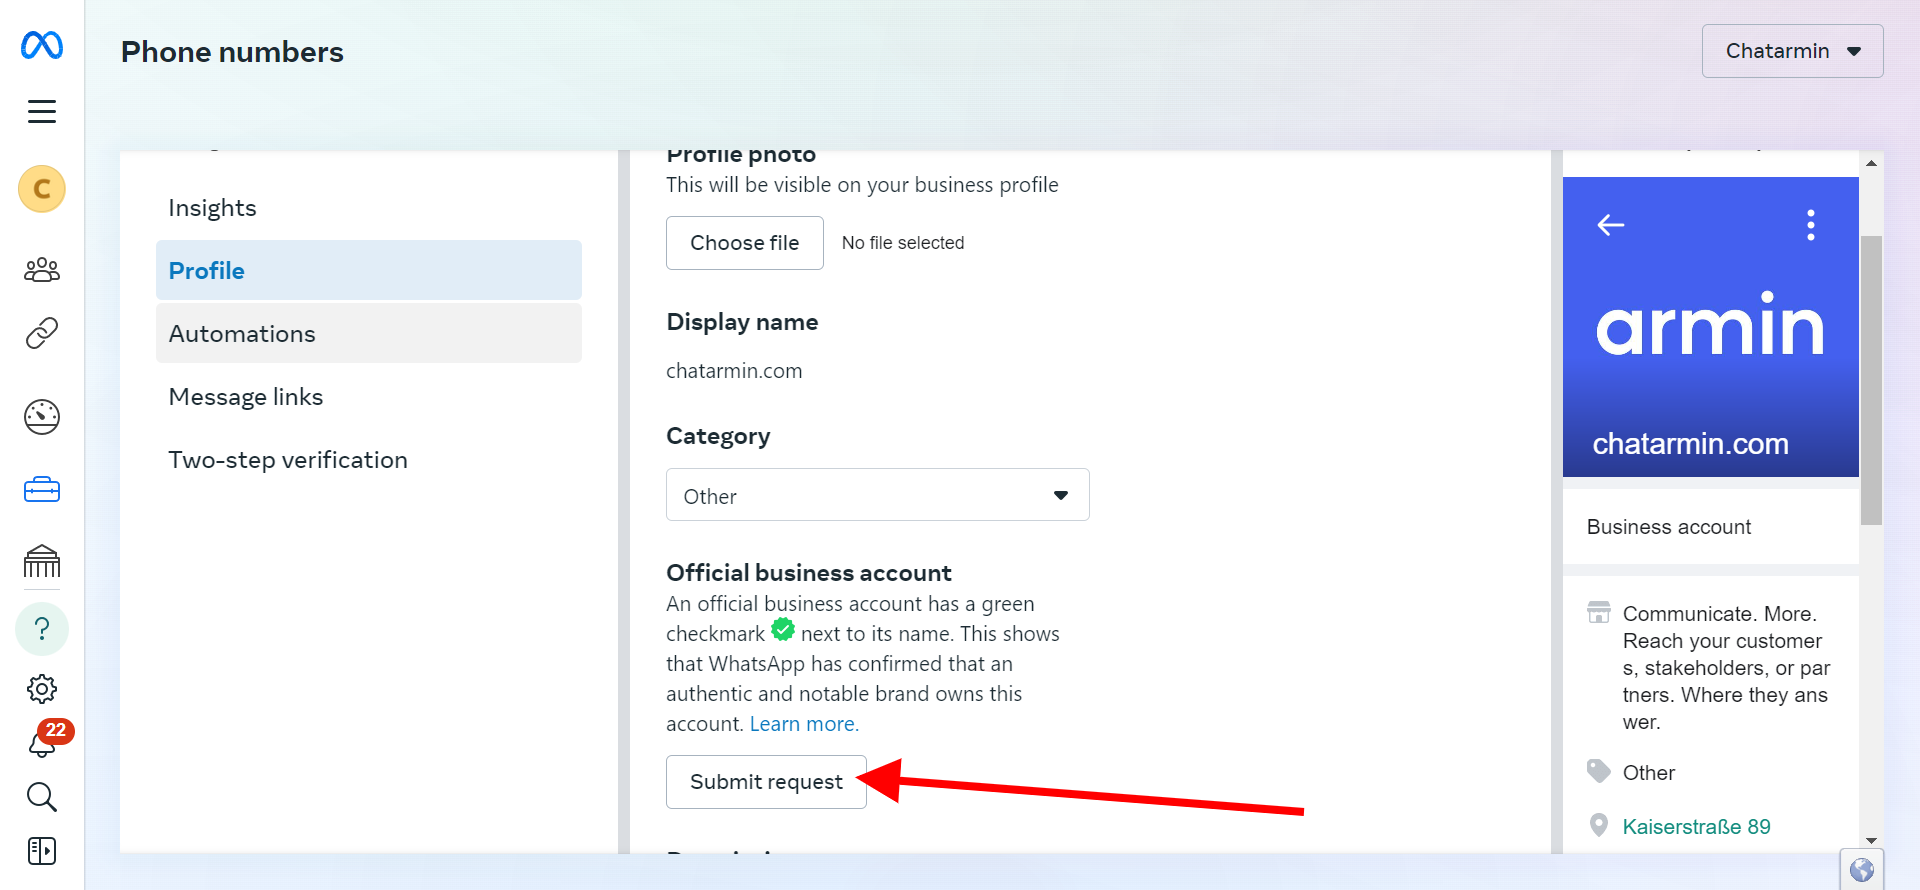
5. Fill out the form with your company's information. The more information you give the better the chance you will get verified. This may take between 24-48 hours.
Did you get denied? Unfortunately, META sometimes may deny your request if they deem your company too small. There is no perfect solution to this issue yet. You will have to wait for 30 days, before being able to send a request again.
6. You can additionally add a profile description under "Description".

4. (Optional) Import your CSV-file
🚨 If you want to start your account from scratch and start building your contact list from 0 up you can skip this step.
Go to "audience"
Click "import contacts"
Drag&Drop your CSV file into the field or click on the field choose your CSV file and
click "open"
Assign the columns of your data to our table fields and click continue
If there are invalid fields, correct the errors or skip those rows
Chose whether you want to replace the duplicates or update them with additional info
Choose a tag for the imported list, eg. "Imported" and click "finalize import"
5. Start building your first flow
You can use our templates to get your first flows up and running. For starting we recommend creating your first "Buzzword Flow".
1. Click on "Flows" on the sidebar
2. Click on "Create Flow"
3. Click on the flow you want to replicate
4. Change the text according to your corporate identity
5. Recreate your templates using the "templates" feature
6. Replace the dummy templates with your own recreated templates
7. Test your flow: Go to "Dashboard->Chatstart Link - Try it->Paste the buzzword from your flow and then click on "Generate & Copy link"
You can then paste this link in the CTA Button of your Pop-up.
Note: To put your Flows live you must "publish" on the top right. Before you click publish the changes are only saved inside the interface but not be sent to WhatsApp.
6. Test your flow
Go to your Dashboard and under Quick-Access -> Chatstart-Link -> Try it
Type in your Buzzword from the previously created Flow
Click "Generate & Copy Link"
Scan the QR Code with your phone or open the link directly
When you are in the WhatsApp Chat with your Business, send the message and see how the flow replies 🎉
7. Create your first Template
Go to "Templates" and click on "Add Template"
Leave the default Template Type and Category as it is. Learn more about Templates here
Add a Body Text with a Variable like:
Hi #{{1}}! We have a new offer!Next, add a CTA-Button to your Website. Scroll down to "Buttons" and choose Call-to-Action -> specify a Button Text & Website-URL
Now click "Save Template"
Add an example for the #{{1}} Variable and click "Submit template"
8. Send your first campaign
Go to "Campaigns" and click on "Send campaign"
Give your Campaign a name
Select the previously created Template
Fill in your Variables
Now select an audience. Select only your contact for testing purposes
At the bottom, select Send now
Congratulations! 🎉 You have sent your first campaign
Your account is good to go!